

A Piece of Functional Furniture Gets a Makeover for a Special Cause
Four years ago, Kristine Franklin, designer and author of the blog The Painted Hive, was selected by Feast Watson, Sydney, Australia-based manufacturer of timber finishes, to participate in their campaign The Re-Love Project. This effort, in cooperation with the Salvation Army, invites designers to upcycle or “re-love” worn furniture items into stunning statement pieces. The completed designs are auctioned 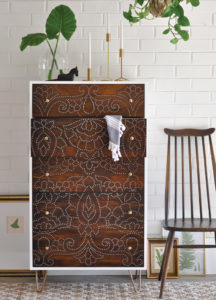 on eBay, with the proceeds going to the Salvos Stores of the Salvation Army. It continues to be one of Franklin’s favorite annual undertakings.
Franklin usually has a concept in mind for these projects and spends time hunting down a piece of furniture that fits her vision. Most recently, she found a simple melamine dresser that needed updating and lots of love. “I chose this piece because it was basic and something that many people might already have or be able to obtain relatively easily,” she explains. “It’s also the kind of piece whose potential might often be overlooked.” Here, Franklin shares an overview of her Re-Love project—a midcentury-meets-Moroccan dresser with one-of-a-kind drilled details.
“I wanted a white finish, and the dresser was already white. But, as with most flat-pack furniture, it looked like . . . well . . . flat-pack melamine furniture!” says Franklin. So, she decided to paint the cabinet box, but not before sanding the unit thoroughly with coarse-grit sandpaper. Franklin carefully wiped everything down to remove any residual dust and grime. Then, using a spray gun, applied four light coats of extra-durable Feast Watson floor paint in White Shine. “There are specialty ‘laminate’ paints you can use [for melamine], but I have found that a really thorough sanding using coarse-grit sandpaper and then a good cleaning with isopropyl alcohol creates a surface which will happily allow any good-quality paint to adhere well,” she says.
After painting, Franklin decided on a decorative design. She created a scale template of the drawer fronts in Photoshop and then enlarged the design to fit. “If you don’t have Photoshop, you can use any image editing program. GIMP is a great free alternative,” she adds. “After taping the sections of the design together, I flipped it over and traced around the entire design using a gray lead pencil. With the drawer fronts in position, I placed the design on top (traced side down), weighted it with something heavy so it wouldn’t shift, and then began sketching over my gray lines.” 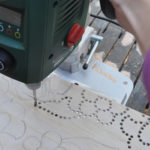

Next, it was time to drill the holes. After many trials, Franklin decided to go with a 6mm drill bit in her Bosch bench drill; it created holes large enough for color to show through yet small enough to accommodate the design intricacies. “Although it’s tempting to drill through super quickly, drilling too fast can splinter the rear of the plywood excessively, so it’s worth taking some time and allowing the drill to do the work,” she advises. “If you are experiencing issues with the back of the plywood splintering a lot, check that your drill bit is sharp and try clamping a scrap piece of wood to the rear of the plywood.” About six hours and 3,000 holes later, this labor-intensive yet completely invaluable step was completed.
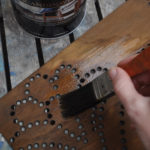
She sanded both the front and rear plywood pieces thoroughly, used a round file to tidy up some of the holes, wiped the new fronts clean, and stained the plywood. “I usually use a rag to apply stain, but in this case I used a brush so I could stipple the stain inside the holes,” explains Franklin. “However, I did use a rag to remove any excess stain, wiping in the direction of the timber grain.” Once the stain was dry, she applied three coats of Feast Watson Scandinavian Oil, sanding with fine-grit sandpaper between applications. After installing the new drawer fronts with Liquid Nails adhesive and a few finishing nails, she completed the look with simple brass knobs.
Franklin says many people have ambitious ideas floating around in their heads. She feels the Re-Love Project provides her with the perfect excuse to push herself by bringing these lofty dreams to life. “More than that though, I have a genuine desire to inspire people, not [by] simply sharing ideas, but by arming them with the information and confidence to have a go at creating something really amazing for themselves,” she explains. “It’s certainly not always easy, but that’s what makes it so rewarding!” Written by Carolyn M. Runyon. Photography by Kristine Franklin, The Painted Hive (thepaintedhive.net).