

A Budget-Friendly Laundry Room Refresh
“I had about five days and $500 to transform a laundry room from blah to beautiful,” says Kristine Franklin, creator of The Painted Hive blog 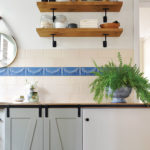 (www.thepaintedhive.net). Franklin was tasked with the last-minute laundry room refresh by Angie’s List, and she met she challenge like a pro.
She recruited her parents’ small laundry room that is located off a hallway, so it is very visible to guests who use the adjacent bathroom. When beginning any redo, Franklin removes as many items as possible so she can see the “bones” of the room. The blank canvas helps her conceptualize and visualize different design ideas. “Because this room is open to the hall, it needed to coordinate with the rest of the home for flow and cohesion,” explains Franklin. “But as this was a DIY, budget-focused makeover, I needed to retain most of the existing features. This meant the flooring, cabinets, and wall tiles would stay and act as the foundation of the remodel.” Painting the walls the same color as the adjoining rooms, Dulux Antique White USA, created that cohesion.
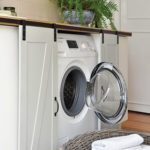
A double cupboard, the bathroom entrance, and access to the outside resulted in many doors. All of them were plain slabs and rather dull according to Franklin, who updated them by adding basic molding to the cupboard and bathroom doors. “I trimmed pine molding to fit, then glued and nailed it to the doors,” she notes. She filled any gaps in the joinery with caulk and then painted the doors white to match the frame molding. Franklin dressed the bathroom doors up some more with a vintage enamel ‘toilet’ sign on the bathroom door and a DIY graphic on the glass of the external door. “The lettering is all vinyl and the directional hand, which I found online as a free clip art download, is a DIY waterslide decal.” Franklin chose a warm sage-gray paint for the exterior door. It complements the blue tiles and adds a charming cottage feel to the space.
Next, she disconnected the faucet and removed the old sink. “Using great care, I chipped away the grout that bonded the old counters to the wall tile and loosened the adhesive that attached the counters to the lower cabinets,” explains Franklin. “It took some patience and persistence, but I was able to remove both counters without damaging a single tile!” The new countertop, KILBY from IKEA, is an oak-toned butcher-block style. Because it was a bit too large for the space, Franklin trimmed it down using a plunge track saw and followed up with some other custom fitting. When everything was in place, she caulked the tile line to create a clean finish.
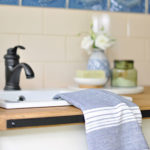
Franklin felt a new ceramic basin would blend better with the adjoining bathroom. This sink is deeper and can also accommodate some laundry functions. She cut an appropriately-sized hole in the counter and dropped the new sink in, caulking around the edges, and connected the new bronze faucet. New decorative shelves, stained in a warm golden brown to coordinate with the counter and cleverly held in place by inexpensive handrail brackets, were added over the washing machine.
Originally, the washing machine was a bit overpowering and detracted from the charming feel of the room. “For something a bit fun and different, I decided to experiment with a custom-made barn door,” says Franklin. “I constructed the plywood doors and painted them Green Result by British Paints to coordinate with the exterior door.” A $5 steel bar and some $1 metal garden edging pegs were used in place of traditional hardware. The country-style doors give cleverly disguised access to the washing machine itself without interfering with the opening of the side cabinet doors.
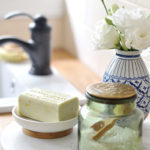
Franklin “shopped” around her parents’ home to find accessories for styling and purchased some inexpensive items as finishing touches. “I looked for hints of blue to reference the tiles; whites and creams to lend freshness; and earthy materials to provide depth, softness, and vibrancy,” she explains. A rust-finished hook for towels, little black cabinet knobs, a brass doorstop, and a fresh coat of white paint on the ceiling vent completed the update. Total cost: $515! Written by Carolyn M. Runyon. Photography by Kristine Franklin, The Painted Hive (thepaintedhive.net).